How to Use Bulk Marking for Scanned Exam Scripts
A practical guide to using Teach Edge Bulk Marking for a batch of scanned or photographed student answers. This guide explains how to prepare scripts, upload them, group pages and review the results.
Quick Summary
- •Bulk Marking is designed for a batch of answers to one question, not a whole exam paper with different sections.
- •Scripts can be uploaded as one PDF, separate images, or a mixture of PDFs and images.
- •Teachers check and confirm the page grouping before any marking starts.
- •Separator pages can be marked as Ignore so they are not included in the marking.
- •Results can be reviewed later through Bulk Mark History, with marks, feedback and a downloadable feedback pack.
Bulk Marking is designed for marking a batch of student answers to a single question.
For example, you might use it to mark a class set of:
- A Level History 25-mark essays
- GCSE English 20-mark responses
- A Level Economics 25-mark essays
- Biology extended responses
- Any other single question or question type supported in Teach Edge
It is not currently designed for whole exam papers with several different questions or sections.
If students have completed a full paper, choose one question or question type at a time and create a separate Bulk Marking run for each one.
Once you have a pile of answers to the same question, you can scan or photograph the scripts, upload them together, check that each student's pages are grouped correctly, and then let Teach Edge produce marks and feedback for each script.
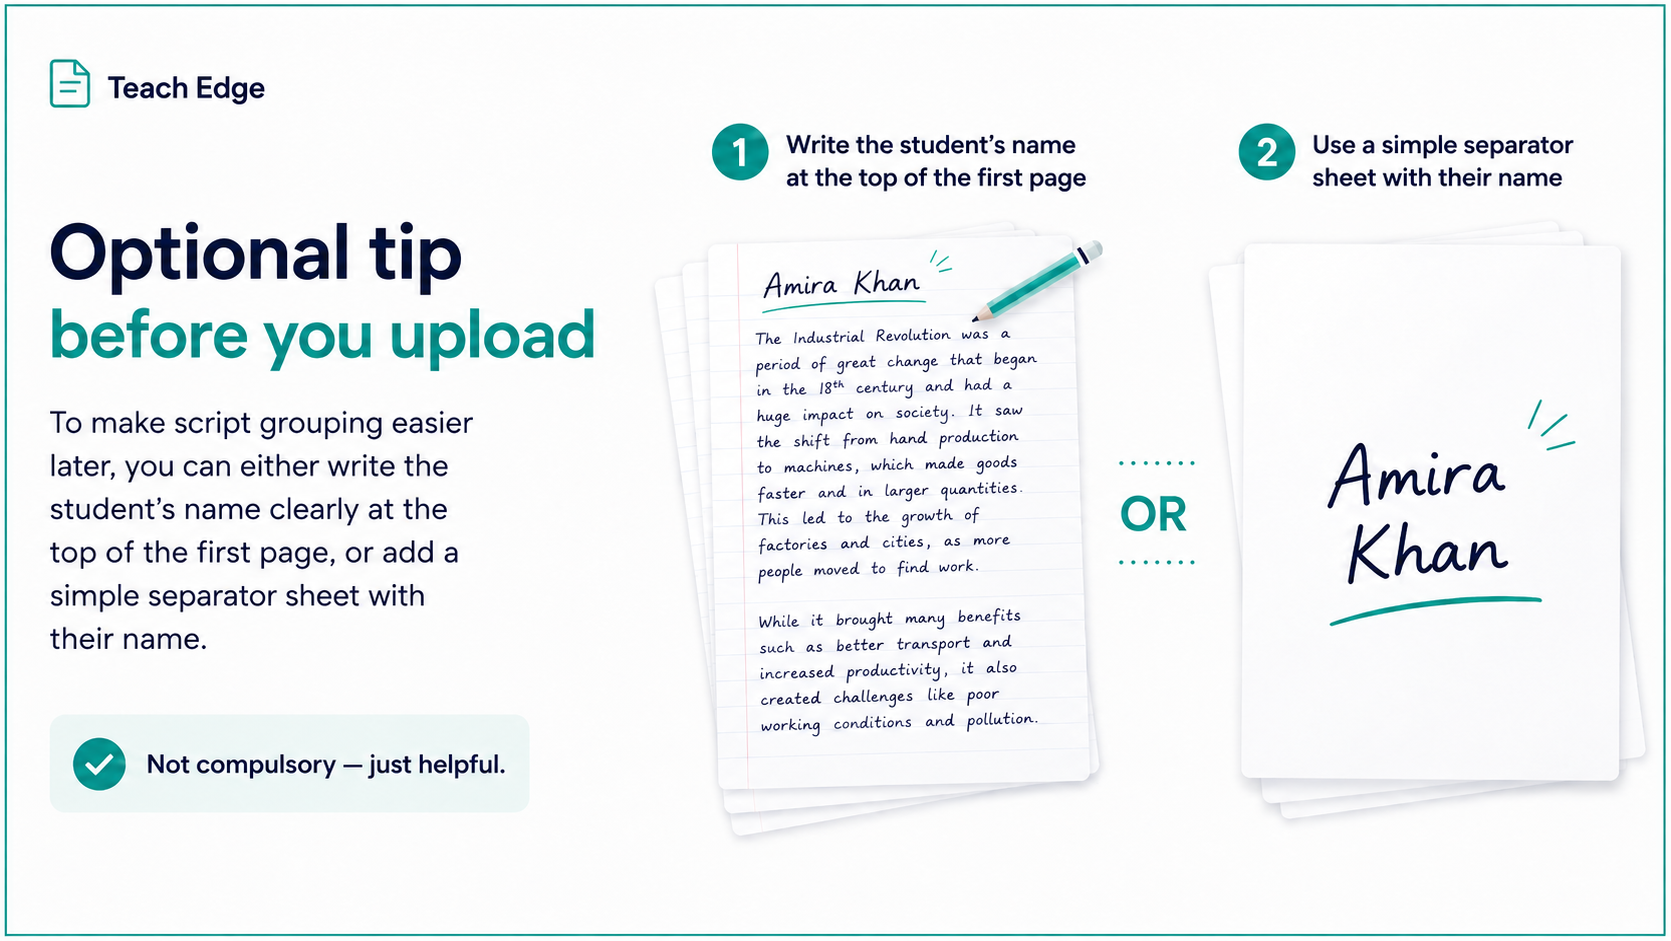
Figure 1: Labelling scripts before upload is optional, but it can make the grouping stage much easier.
Before you start: label the scripts if possible
Before scanning, it can be helpful to make each student's script easy to identify.
You can do this in either of two simple ways:
- Write the student's name clearly at the top of the first page of their script.
- Add a simple separator page before each student's script, with their name written clearly on it.
This is not compulsory, but it makes things easier later when you are checking the script groups.
If you use separator pages, you will be able to mark them as Ignore later so they are not included in the marking.
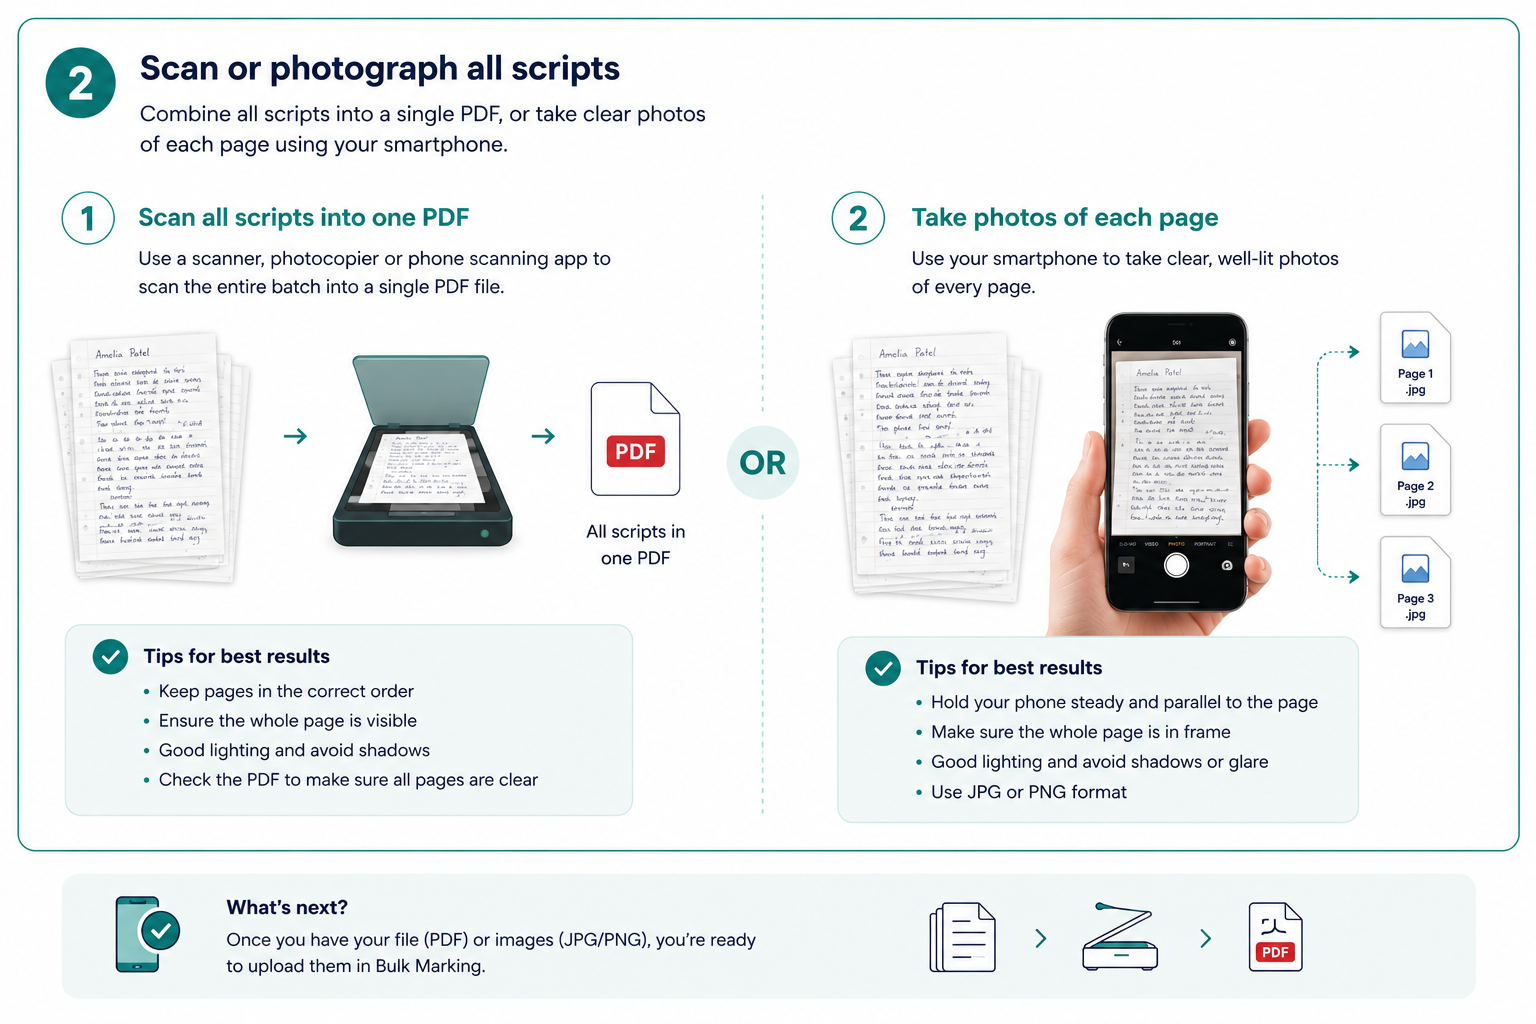
Figure 2: You can scan the whole batch into one PDF, or take clear photos of each page.
Step 1: Scan or photograph the scripts
Start with the physical scripts.
You can either:
- scan the whole batch into one PDF
- take clear phone photos of each page as JPG, JPEG or PNG images
- use a mixture of PDFs and images if needed
For most teachers, the simplest method is to scan the full batch into one PDF using a photocopier, scanner or phone scanning app.
For best results:
- keep each student's pages together
- keep the pages in the correct order
- make sure the whole page is visible
- avoid shadows, glare or cropped edges
- check that handwriting is readable before uploading
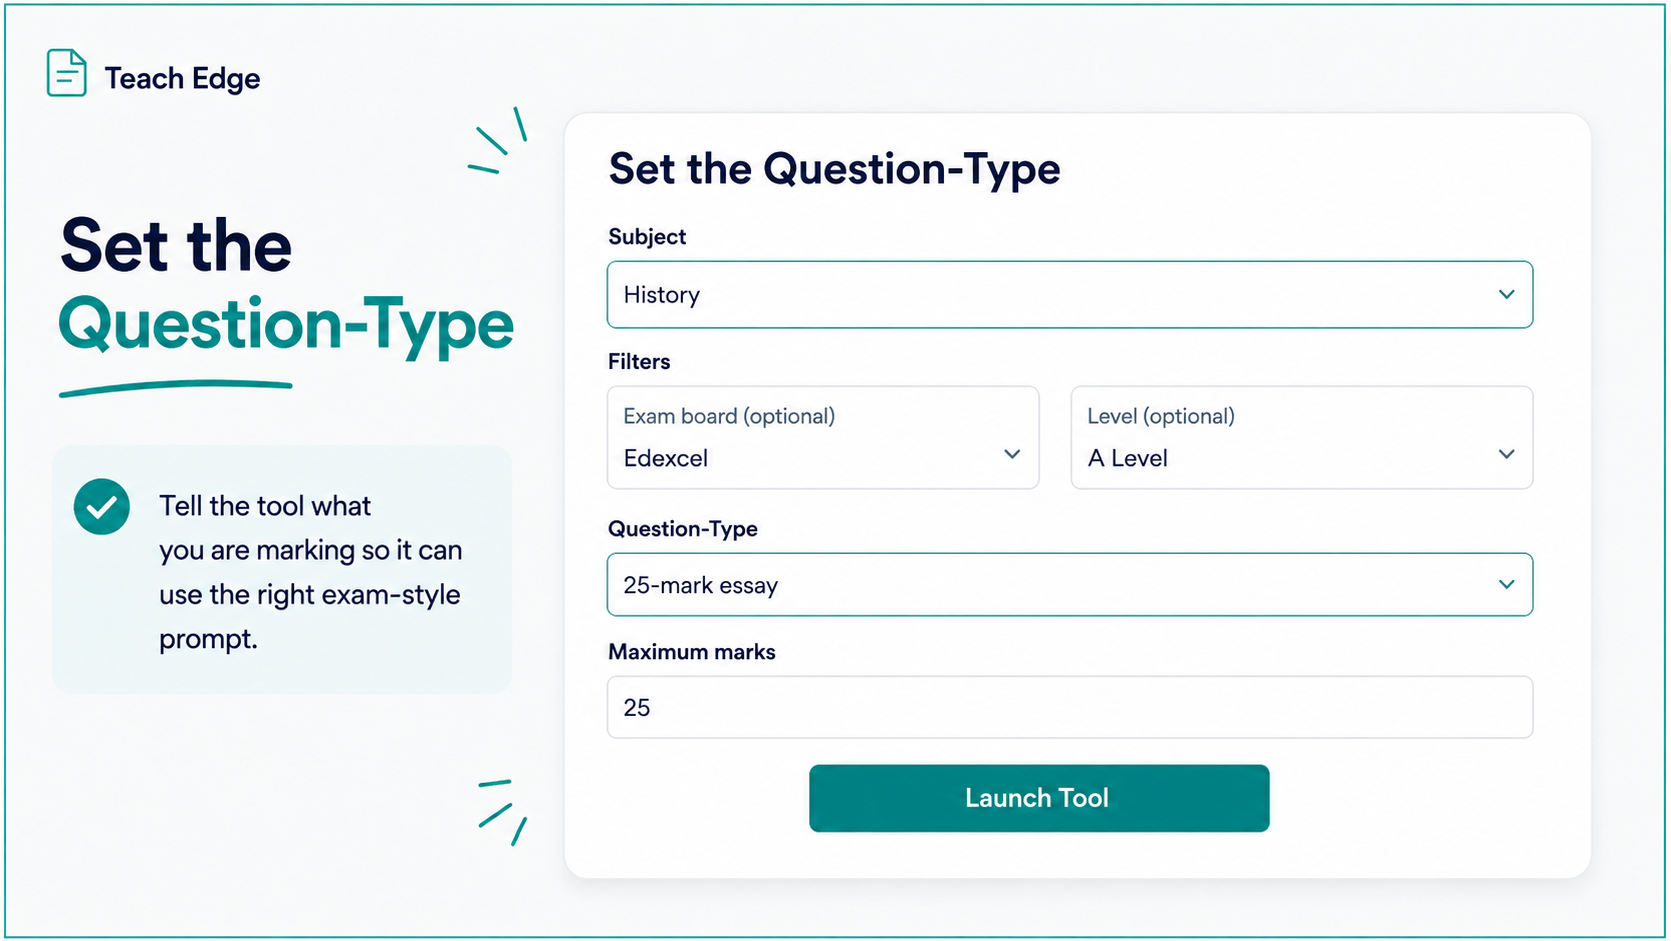
Figure 3: Set the question type first so Teach Edge can use the right exam-style marking setup.
Step 2: Open Bulk Marking and set the question type
Once your scripts are ready, open Bulk Marking from Teach Edge.
You will first need to tell the tool what kind of answer you are marking. This allows Teach Edge to use the correct exam-style marking setup.
Select the relevant:
- subject
- exam board
- level
- question type
- maximum marks
For example, you might choose:
History → A Level / KS5 / Level 3 → AQA → AQA History A Level: 25 Marker → 25 marks
This step matters because Bulk Marking is not just producing generic comments. It uses the selected question type and marking criteria to guide the feedback.
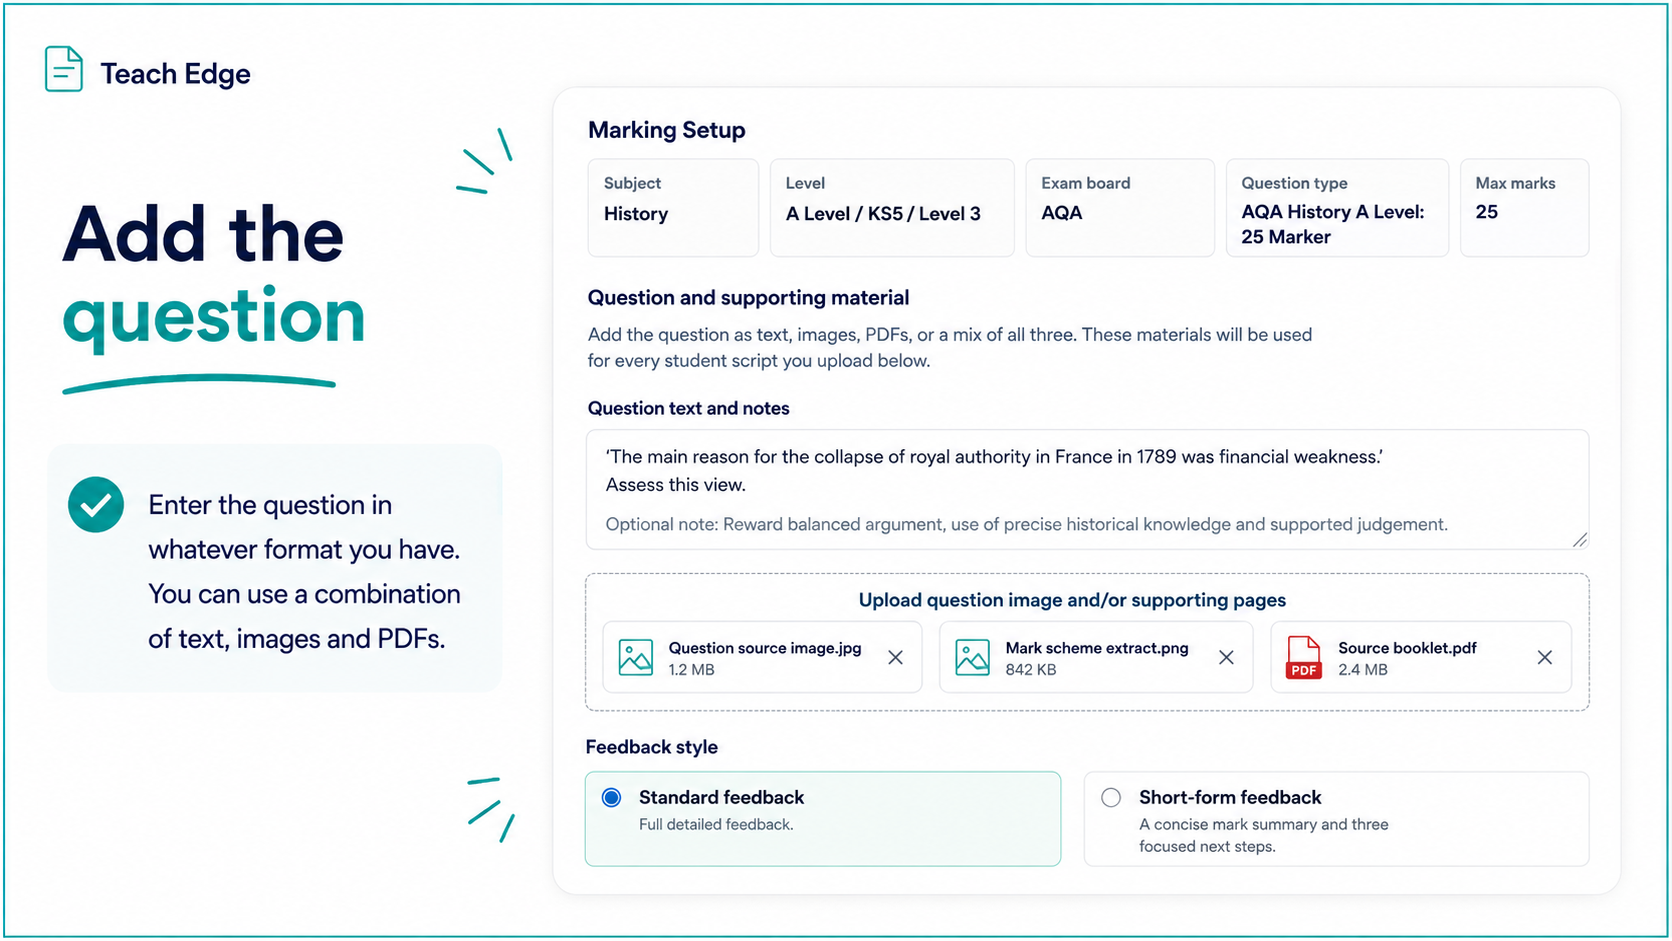
Figure 4: Add the question and any supporting material that should be used for every script in the run.
Step 3: Add the question and supporting material
Next, add the question you want Teach Edge to mark.
You can enter the question in several ways:
- type or paste the question text
- upload an image of the question
- upload a PDF containing the question
- upload supporting materials such as sources, extracts, data, case studies or mark scheme notes
- use a combination of text, images and PDFs
This material will be used for every student script in the batch, so make sure it contains everything the AI needs to understand the task.
You can also add any important notes, such as mark scheme guidance or instructions about what should be rewarded.
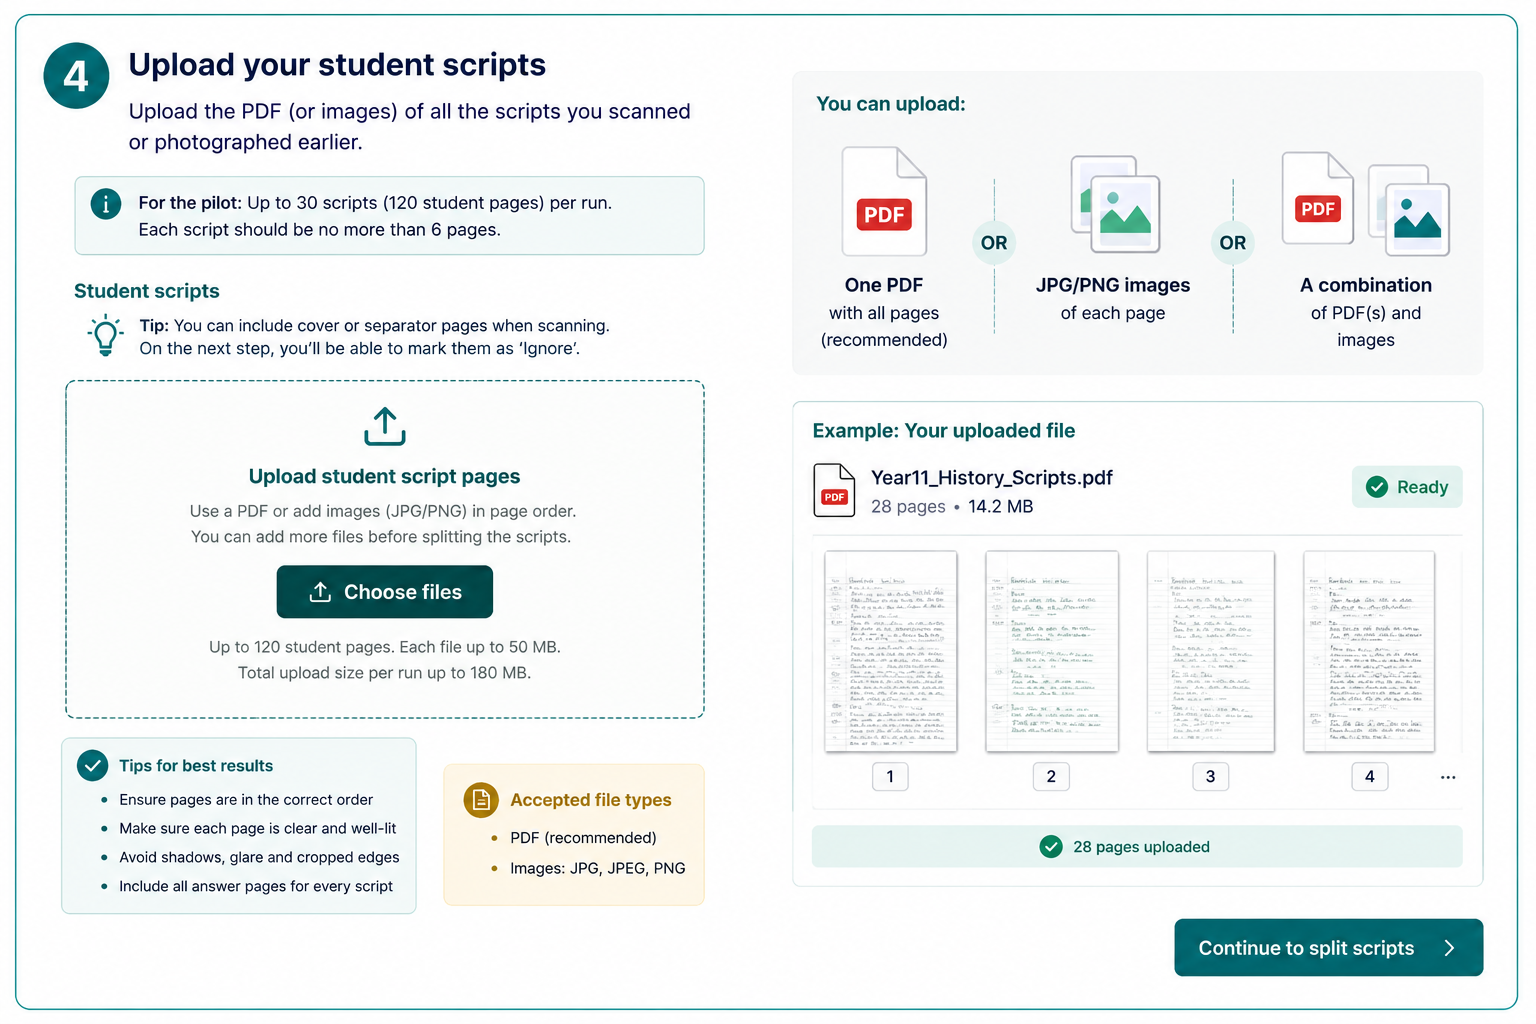
Figure 5: Upload the scanned student scripts as one PDF, images, or a combination of files.
Step 4: Upload the student scripts
Now upload the scripts you prepared earlier.
You can upload:
- one PDF containing all student scripts
- separate JPG, JPEG or PNG images of the pages
- a combination of PDF files and images
Bulk Marking will use the uploaded pages to create the student script groups in the next step.
During the pilot, each Bulk Marking run can include up to 30 scripts and up to 120 student pages. Each script should be no more than 6 pages.
If you have a larger set, split it into two separate runs.
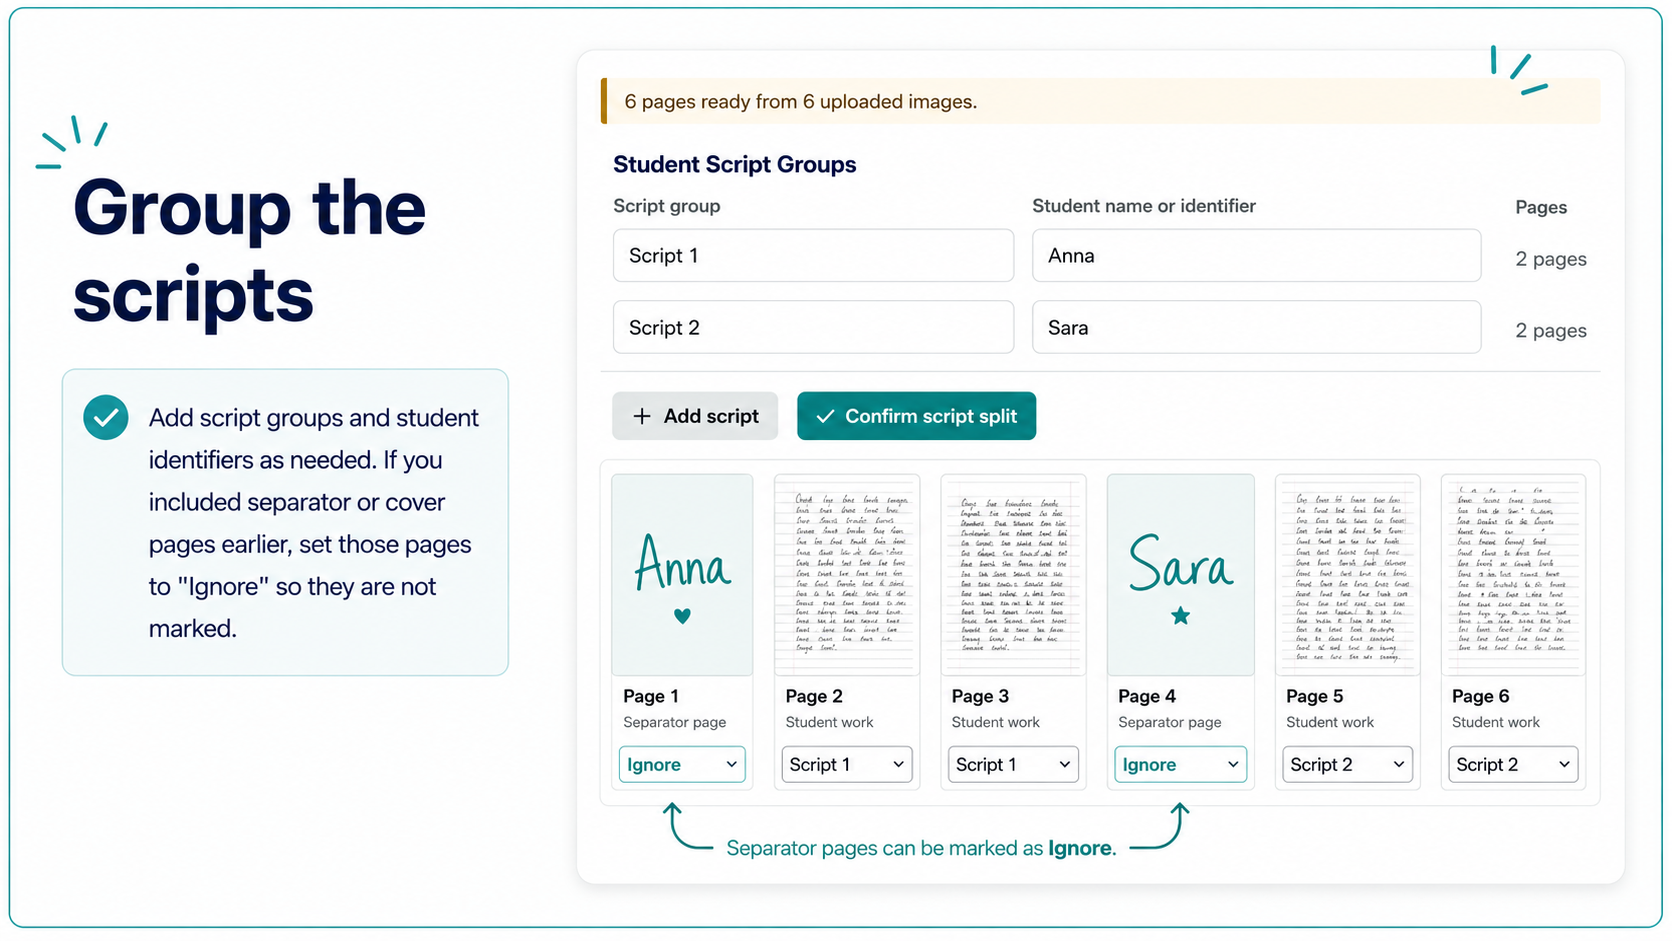
Figure 6: Check the page grouping carefully and mark separator pages as Ignore.
Step 5: Group the scripts and add identifiers
After uploading, Teach Edge shows the pages so you can check how they should be grouped.
This is the key human-checking step.
You can:
- add script groups as needed
- enter student names or identifiers
- assign pages to the correct script
- mark separator or cover pages as Ignore
- confirm that each student's pages are grouped correctly
For example:
- Page 1: separator page → Ignore
- Pages 2–3: Anna → Script 1
- Page 4: separator page → Ignore
- Pages 5–6: Sara → Script 2
This step keeps the process controlled. Teach Edge is not blindly guessing which pages belong to which student. You get to check the grouping before marking starts.
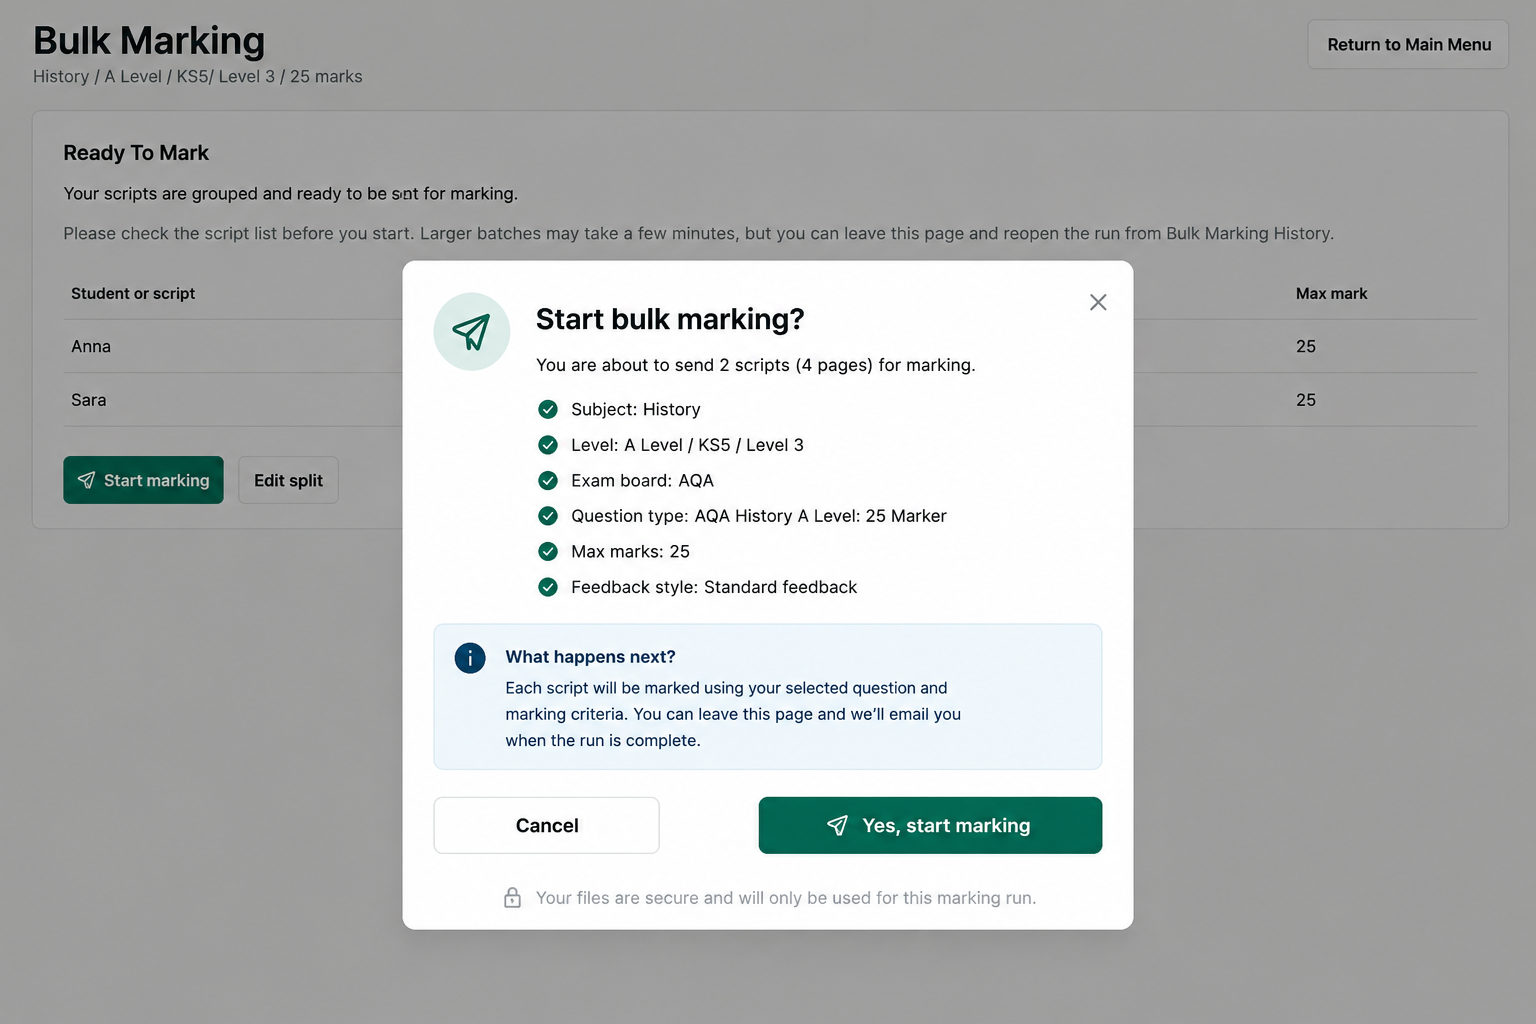
Figure 7: The final check before the scripts are sent for marking.
Step 6: Confirm and start marking
Once the scripts are grouped, you will see a final confirmation screen.
Check that the details are correct:
- number of scripts
- number of pages
- subject
- level
- exam board
- question type
- maximum marks
- feedback style
When you are happy, click Start marking.
Teach Edge will then send the scripts for marking. Larger batches may take a few minutes, but you do not need to stay on the page the whole time.
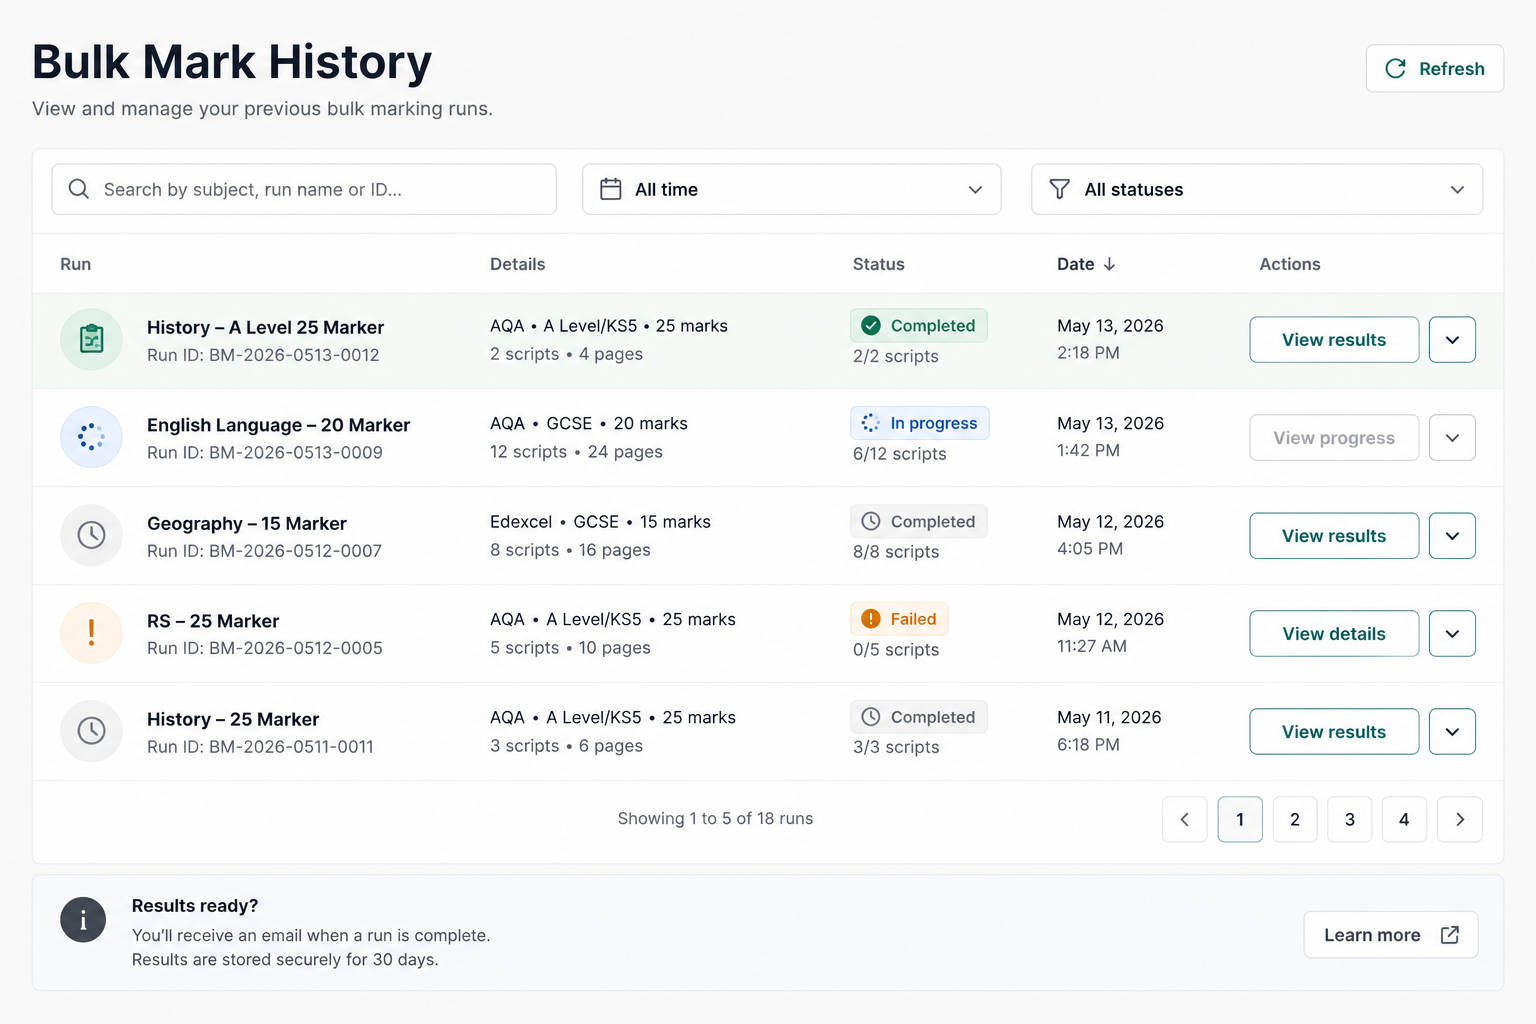
Figure 8: Bulk Mark History lets you return to runs that are completed or still in progress.
Step 7: Wait for the results or come back later
You can wait for the results to appear, or you can return later through Bulk Mark History.
Bulk Mark History shows your previous runs, including whether they are:
- completed
- still in progress
- failed
- ready to view
This is useful if you are marking a larger batch and want to leave the page while Teach Edge continues processing.
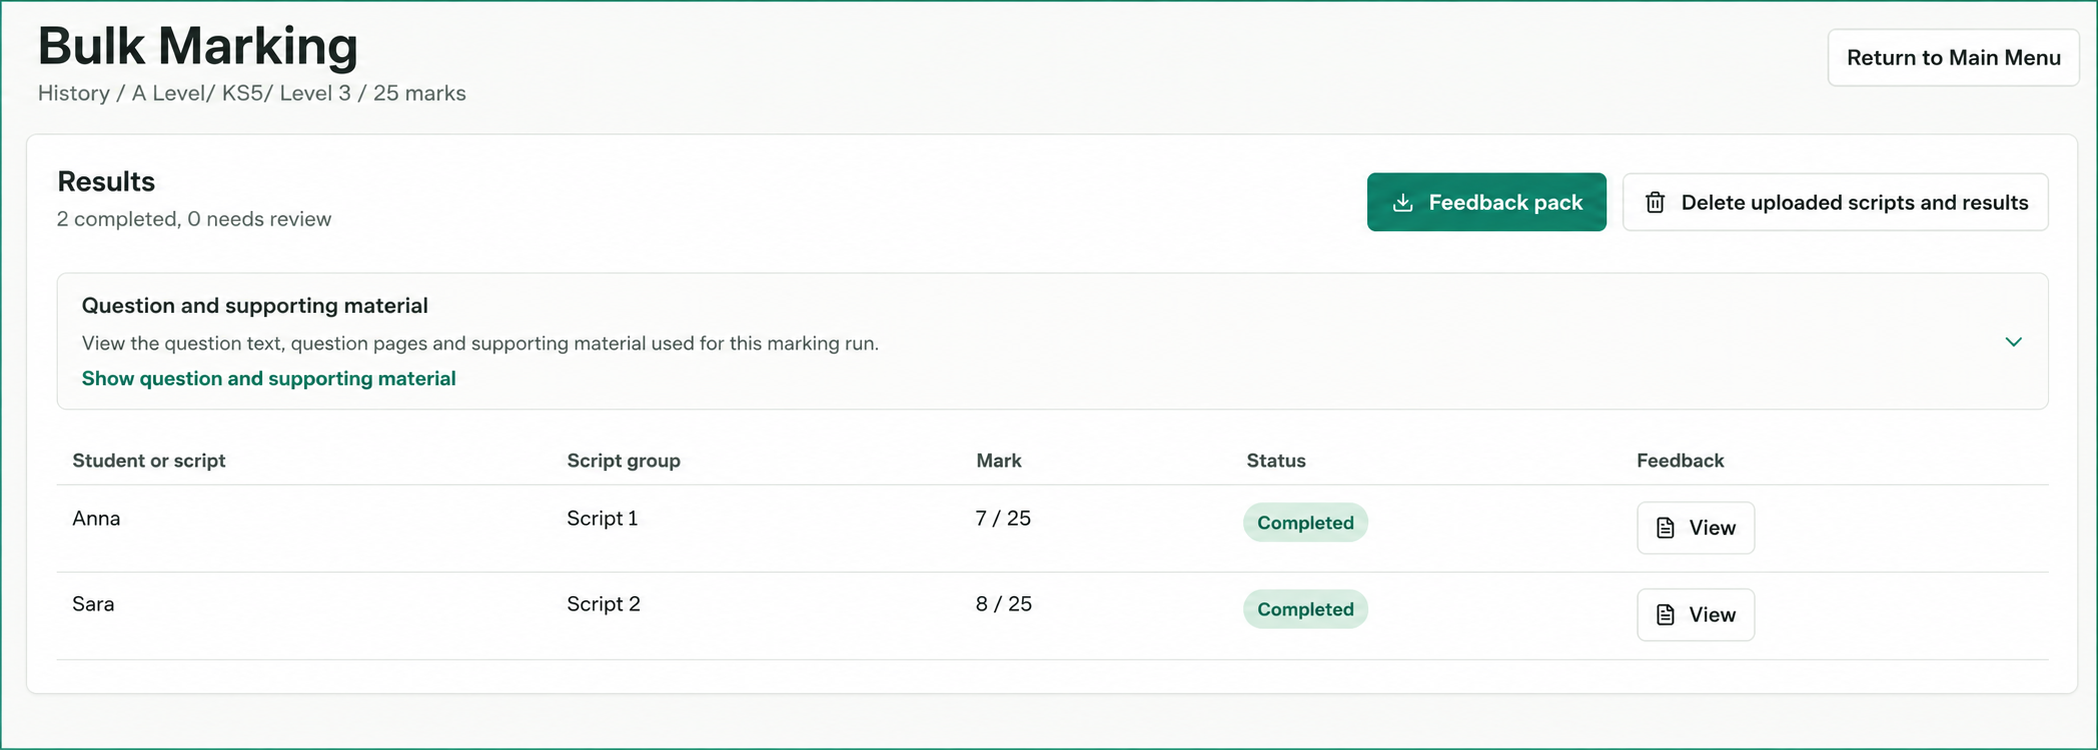
Figure 9: The results screen shows each script, the mark awarded and a button to view the feedback.
Step 8: Review the results
When the run is complete, you will see the results screen.
This shows:
- each student or script
- the script group
- the mark awarded
- the status
- a button to view the feedback
You can open the feedback for each student and review the mark and comments.
You can also download the Feedback pack if you want a single file containing the feedback from the run.
A few practical tips
For the smoothest experience:
- Use one question type per Bulk Marking run.
- Do not upload a full exam paper with multiple different questions unless you are only marking one selected question.
- Keep all pages in the correct order before uploading.
- Use separator pages if you are scanning several scripts together.
- Mark separator pages as Ignore during grouping.
- Check the script groups before starting the marking.
- Review the feedback before sharing it with pupils.
Bulk Marking is there to save time, especially with scanned exam scripts, but teacher judgement still matters.
The best workflow is to let Teach Edge do the first pass, then use your professional judgement to review the results.
Related Posts
What Makes Teach Edge Different from Other AI Marking Tools
Teach Edge goes beyond one-script-at-a-time AI marking. It supports original question generation, class assignments, Quick Mark, Bulk Marking Beta, teacher review, progress tracking and feedback workflows for real secondary classrooms.
The Part of the AI Marking Debate We Keep Missing
The AI marking debate is often framed as a choice between slow but personal human feedback and fast but impersonal automation. The more useful model is different: AI drafts first, and the teacher reviews, adjusts and approves what the student actually sees.
What students actually think about AI marking and feedback
King's School, Chester ran an independent student voice survey on TeachEdge after around 18 months of use. Here's what 148 students said about clarity, speed, progress, and trust in marking.
Ready to transform your marking workflow?